Sunday, April 12, 2015

Voltage, Current, and Resistance


Purpose:  In this lab, we investigate the behavior of current through a wire. We will determine how current flows through a wire. We will also determine what measurable variables factor in the flow of the current. A majority of the experimentation we be done using light bulbs, wires, an electroscope, and multimeters.

Lighting a Light Bulb


To start off, we are given the task of powering a light bulb using a battery, one wire, and the light bulb itself. The picture above demonstrates how we were able to light a light bulb. In a later picture, we will explain how this works.

Electroscope


Professor Mason introduces the electroscope. This device allows us to detect charge on an object by placing the charged object on the top sphere. The charge travels through the sphere, into the box, and inside the box lies two metal plates. The metals plate gain the same charge as the charged object that is placed on the metal sphere and this causes the metal plates to separate, thus detecting charge.

How Does a Light Bulb Light Up


In reference to the light bulb experiment above, we demonstrate how exactly the light bulb lights up. We see the on the top left, two examples are given for the proper way of lighting a light bulb. We connect a wire at one end of the battery and the other end of the wire to the side of the metal screw on the light bulb. Then, we connect the bottom end of the light bulb to the other end of the light bulb, as shown. This is done in this manner because there is a filament inside the light bulb. one end of the filament is touching the screw end of the light bulb, the other end of the filament is touching the bottom of the light bulb. We will discuss more about how this works when we investigate the battery.

Investigating The Battery


We examine what would happen if we put the positive end of the battery on the electroscope. Nothing happened. We refer to the light bulb experiment. The reason the light bulb lights up is because there is current that flows through the bulb. The reason current is able to flow through the light bulb is because the electrons in the wire become attracted to the positive charge in the battery. This causes the electron to flow in the same direction. The battery contains a finite amount of energy and this energy allows for work to be done on the bulb.


Our picture shows what would happen if we use two light bulbs instead of one. It turns out that the light bulb shines much brighter. The more light bulbs used to power light, the more energy is available; therefore, more work is done to light the bulb.

Using An Old Ammeter


We begin to wonder whether the current in the light bulb is the same before the current enters the light bulb and after the current enters the light bulb. It may appear to make sense to some that there would be less current, since some less energy is used up when work is done to power the bulb.


Our group, on the other hand, predicted that the current would be the same before and after because we we believed that whatever flows in, must flow out at the same rate. Well, we see that the work done on the light bulb does cause the light bulb to take energy out of the system, but this doesn't influence the current. We wrote that power equals the voltage time the current and we see that the power is measured in joules per second. We also see that the voltage is measured in joules per coulomb. These two entities are reliant on the energy in the system, but the current is measured in coulombs per second. This is another way to see why the current does not change when energy changes. 

Finding Charge


We discuss the 4 variables we need to find charge. The cross sectional area can be viewed as the area of the circular side of a tube. Current would flow through the tube and it is the cross sectional area that is important in finding charge. Of course, the tube's cross sectional area does not have to be circular, it is just for relatable visualization purposes. The drift velocity is the velocity of the current of the electrons. 

Proportionality Of Current and Voltage


We start to set up our next and final experiment. This experiment will allow us to evaluate the relationship between current and voltage. 


Our group says that current and voltage are proportional to each other. We find that this is in fact true, but we know that when it comes to proportionality, there is a variable to account for. We find that this variable is called the resistance. We conclude that the voltage is equal to the current times the resistance, but we later realize that this is not always true. Some materials do not follow these predicable behaviors and, therefore, are not ohmic.

What Factors Into The Resistance


We take a look at some different pieces of wire and measure their resistance. We look at simmilar behaviors in length and other physical properties. We begin to see that the physical properties, do factor into the resistance. We find that the resistance becomes greater when the length or the wire increases, but becomes lower when the thickness of the wire increases. This can be explained visually and symbolically. If we look at the relationship between resistance, voltage, and current, we find that the current is reliant on the thickness and the voltage is reliant on the length. We also factor in the constant that represents the material.

Conclusion:  Using light bulbs, wires, and multimeters, we found relationships between current, voltage, and the resistance. We were able to do what Harvard graduates could not, which is power a light bulb with a battery and one wire, and we were able to use what we learned to explain how the battery is lit. We, also, found that the ohm's law isn't always ideal for calculating resistance, so we found a different way to do it using its physical properties.


Monday, April 6, 2015

Gauss's Law


Purpose:  In this lab, we take a look at some of the behaviors of electrical fields. To do this, we use Gauss's Laws to get an idea of the magnitude of the electrical field at a given distance from the charge. We will also take a look at various situations involving microwaves.

Cal Tech's Electric Field App


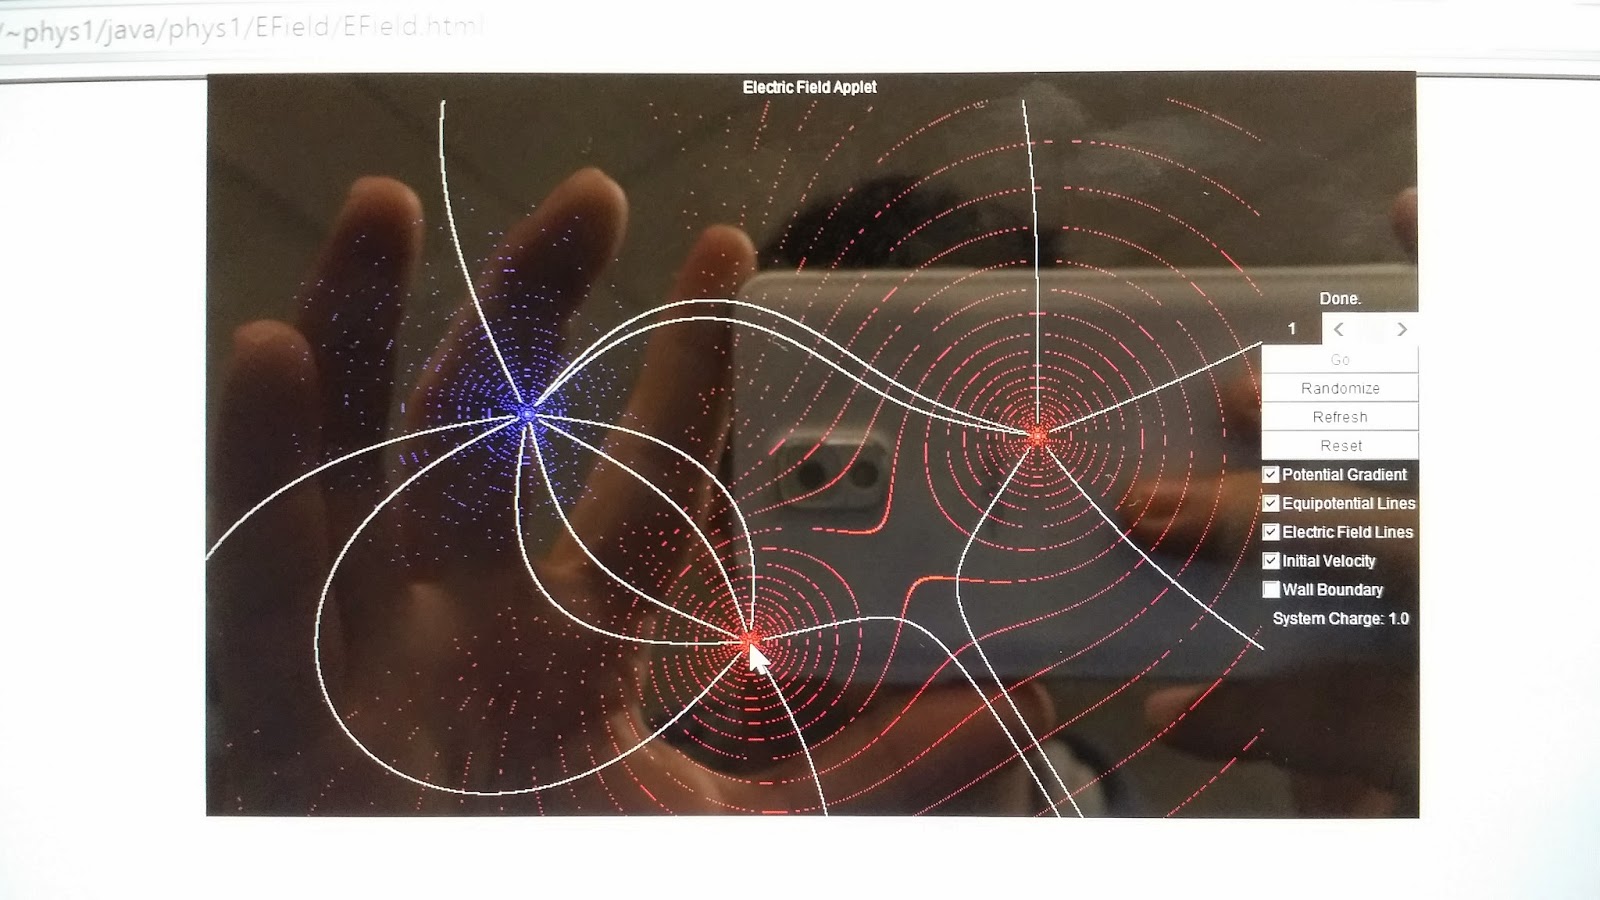
To begin, we take a look at a program, on Cal Techs website, that shows a visual representation of electric field lines between two charges. In this picture, we see two charges of opposite charge create symmetrical lines in between. This is very typical of dipoles. We can see the red point is surrounded by red circles. This is to show that the electric field shoots out radially. The same occurs with the blue point, but the electric field shoots inward instead of outward. The sum of the two electric fields at a given point is shown by the white lines.


This now shows the behavior of the electric field lines if another charge of the same magnitude is put in. We can see a repelling behavior between same charges and a dipole between opposite charges.

Redrawing the Field Lines


We re-draw one of the visual representations of the electric field lines and put arrows to display the direction of the electric field lines. The electric field lines of a negative charge point inward while the electric field lines of a positive charge point outward. We also draw some Gaussian surfaces and take the sum of these charges within these surfaces. After, we find the flux through the surfaces and calculate the net flux.

The Electric Field of a Conducting Cylinder


We utilize the vandegraff generator to distribute charge along a conducting cylinder. We were given the task to predict what would happen to the pieces of metal that hang inside the cylinder and outside the cylinder.


Before we find out what happens to the pieces of metal, we discuss the relationship between flux and charge. We write that flux and charge are proportional to each other. We also cover a little unit manipulation  and solve for the k value that multiplies charge to account for the proportionality between the two. It turns out the k was equal to one over epsilon knot. We then say that flux equals to the charge enclosed within the surface divided by the permittivity of free space.


Our group believed that nothing would happen to the pieces of metal that lie next to the conducting cylinder.


We find that our prediction of nothing moving is wrong, as the metal on the outside of the cylinder tries to distance itself from the conducting cylinder. The metal on the inside does not move. This is explained using Gauss's Law. There is no electric field inside the conducting cylinder but there is an electric field outside the cylinder. In the equation for flux, the charge enclose inside the cylinder is zero.

What Do Charges Do Inside Conductors?


We draw how eight charges behave inside a conductor. These charges look for the furthest distance apart. This means that they lie on the outer end of a cylinder. Charges are able to move, almost completely freely, within a conductor. We also discuss the the best possible place to be during a lightning storm. We say that it is best to be inside a car because the car acts as a Faraday cage, where a large portion of the charge flows through the car and into the ground. Some charge may enter the car, but if a person does not touch anything metal inside, a person should be safe, as electrical charge tries to flow through the outer ends of the metal.

What Happens If We Double The Radius?


We take a look at some arithmetic. If we double the radius of the circumference, the circumference doubles as well, but if we do the same for the area, the area increases by 4 times. This is because the 2 is also squared. The same goes for volume, which involves a power of 3.

What Happens If The Radius Is Halved?


We found that if we halve the radius, the volume goes to one over eight. We also see that we generally do not have to worry about the angle between the electric field vector and the area vector, as they generally point in the same direction, causing the angle to be zero and cosine of zero is one.


We take a look at the applications of Gauss's Law. We say that the charge density of an object with a small radius is equal to the charge density of an object with a large radius. We solve for the charge of the small volume and this gives us a relationship with a larger charge. Because we are looking at the small charge, we draw an imaginary Gaussian surface at the radius r and this gives us a surface area at radius r. The r's cancel and we get a simple equation for the electric field in terms of r and R. We, then start to look at a cylinder and its total surface area.

Electric Field Inside of an Insulator


We take a look at the electric field inside an insulator. We use the relationship of charge q and Q using charge density. With some substitution, we solve for the electric field inside an insulator in terms of the radius within the insulator.

Gauss's Law In Terms of Gravity


We took a different look at Gauss's Law by looking at it in terms of gravitation. We set the mass of earth over a constant k equal to the integral of Y dA. When we plugged everything in, we found that Y was equal to the acceleration of gravity.

Steel Wool in an Microwave


We start of the "what you should never do" by putting steel wool inside a microwave. Sparks flew and we were able to see that the electric field was strongest on the points as discharge was occurring on the points.

Fork Inside a Microwave


We see the same kind of effect that occurred in the steel wool happening to a fork. The tips of the fork began to light up, as the electric field was strongest there. This is because the charge density is highest at these points. We can draw a circle representing a sphere and place this circle over the points on the fork and we will see that there are more electric field lines passing through the surface area. The are "less" electric field lines passing through the same surface on the other end of the fork.

Compact Disk in a Microwave


Again, sparks occur on the CD because the CD contains some metal. Like the steel wool and the fork, the sparks occur where the electric field is highest.

Light Bulb Inside a Microwave


When we apply an electric field around a light bulb, the light bulb lights up and then changes color. It changes color because plasma is create when the temperature reaches a high temperature.

Conclusion:  We find that Gauss's Law helps us visualize how electric fields behave and this is easy using simple surfaces. We went into the changes of area and volume if we change the radius value. We, also, took a look at the electric field inside a conductor and inside an insulator. Inside a conductor, the electric field is zero. Inside an insulator, the electric field varies with position inside the insulator. To finish things off, we take a look at what happens when we get an electric field build-up on a metal. Build-up, generally, leads to sparks.